.
- Steelhead trip 2013
- Meeting 2014
- BC Trip 2014 / 1
- BC Trip 2014 / 2
- BC Trip 2014 / 3
- BC Trip 2014 / 4
- BC Trip 2015
- by W. Fabisch
- Angling or fly fishing
- Norvise Tuning
- Norvise Tuning Two
- How to use while...
- With strike Indicator
- How to fish nymphs
Norvise Tuning by W. Fabisch, fly tying
Tuning in four steps
On this page I'd like to pass on a few ideas about modifications on the Nor-Vise that could make your fly tying a little easier. In several years of experience with the Nor-Vise, I have made a few modifications for some of my customers and for myself. Feel free to try them if you like.
Three of my proposed four steps can be handled by anyone. For step three you should be able to work with a lathe or ask someone who is.
.
Have fun trying my suggestions and tying your flies with a tool rotating even better after tuning than one off the assembly line.
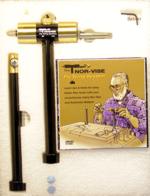
Your Norvise comes to you like this, ready for fly tying
It is perfectly well suited to tie flies. There are, however, a few ways to tune it. You needn't folow every suggestion - every single one improves balance and speed of the Norvise.
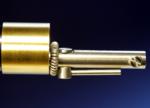
Step one
When delivered, the lever to open and close the jaws is below the jaws, way out of the axis of rotation. I takes less than 30 seconds to modify that.
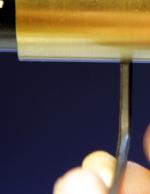
Open the front set screw with a hex key so you can take out the jaws.

Take them out, turn them 180° and put them back in. Once they're in place, screw the set screw back in.
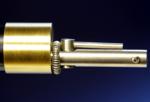
This simple measure brings the lever closer to the axis of rotation, considerably reducing dynamic imbalance. Your Norvise will rotate longer and vibrate less than before if rotated with an equal momentum.
The user will, however, have to get used to moving the lever backwards to open the jaws.
.
.
So much for step one.
.
.
Step two doesn't require any special knowledge of mechanics either.

Step two
The grease used to lubricate the bearings of this tool is a bit viscous in my opinion. You can improve the situation by applying some low viscosity spray lubricant.
First you open the rear set screw and take the complete brass part out towards the front.
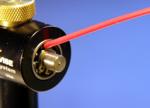
Here you can easily apply your spray lubricant. Apply sparsely, please!
Next you put the brass back onto the axis and tighten the set screw. When you took out the brass, the vise was fixed in a 90° position, and you should fix it in the same position when you put it back in.
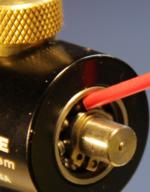
The rear bearing is somewhat more complicated to get to. If you can, remove the snap ring on the axis before putting the front part back on. Then loosen the knurled-head brass screw (see top left on the photograph on the left), and pull out the rear brass part towards the rear.
Now you can sparsely apply your spray lubricant to the rear bearing. Then put the axis with the brass part back in, apply the snap ring, and continue as above.
.
If you can't remove the snap ring, put the front part back on. Next, take out the rubber ring on the rear brass part, and remove the brass part towards the rear.
You will see an aluminum disc with a slit on the axis. This disc is also fixed to the axis by means of a set screw. Before you unscrew this set screw, it is imperative that you mark the position of the disc and the slit with a permanent marker.
Once the aluminum disc is removed, the rear bearing is accessible. Apply your spray lubricant sparsely and put everything together again.
.
.
The next step requires some experience with a lathe. If you haven't got that, call in someone who does.
Step three
I never liked it when ribbing material or short ends of body thread kept whipping around behind the head of the vise once you rotated it. For decades I've been winding such materials on sewing machine spools for my tying. So I looked for a way to use them on my Norvise.
If the dynamic imbalance could be reduced to almost zero, all the better!
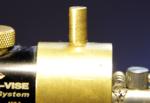
As usual, a solution to a problem seems obvious and simple, once it is presented. The problem is in seeing it before. As you can see on the photograph, I have added a pin opposite the jaws in the brass cylinder. There are several ways to apply it: you can cut a thread into the pin and into the cylinder and screw it in place or you can just drill a hole into the cylinder, stick the pin in and use cement to hold it in place.
There are certainly even more ways, but I stuck to cement.

The pin alone already further reduces dynamic imbalance. The pin should be machined to a very slightly conical shape as to hold the sewing machine spool in place, even if the vise rotates at full speed.
Now, be careful as not to fill your spools to much! See photograph.
.
.
So much for step three.
.
.
The last step is the simplest one.

Step four.
This is the simplest step, but nevertheless the most costly one. The brass parts of the Large Inline Conversion are considerably larger and heavier than the Standard Small Inline Set the Novise comes with when you first buy it
I always use the rear brass part of the Large Inline Conversion, no matter which head I'm using. The added weight adds momentum and improves rotation a lot.
.
.
Now it's up to you if you'll just take one step, several ones, or all four of them. Every single one will improve rotation on your Norvise.
.
.
Wolfgang Fabisch, Nürnberger Str. 45, 90542 Eckental/Germany
✆ Germany 011 49 9126 288640, Fax 011 49 9126 288643, Wolfgang Fabisch