.
- Steelhead trip 2013
- Meeting 2014
- BC Trip 2014 / 1
- BC Trip 2014 / 2
- BC Trip 2014 / 3
- BC Trip 2014 / 4
- BC Trip 2015
- by W. Fabisch
- Angling or fly fishing
- Norvise Tuning
- Norvise Tuning Two
- How to use while...
- With strike Indicator
- How to fish nymphs
Tuning Your Norvise two - Making Your Fly Tying Even Easier
To do this you need some experience
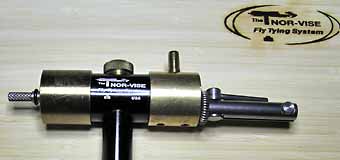 The left brass part on the picture is the back one. At this the conversion is made.
The rear brass part on the Norvise may move on its own.
.
I have been selling the Norvise System for many years and I do 90% of my own tying on this vise.So I keep gathering information on its function, and I keep checking on ways to improve it. I do like Norm and his ideas but still, there is room for improvement, as you may see on my first blog on tuning the Nor-vise.
.
.
The problem I´d like to address today concerns the rear brass cylinder, the one that is not carrying the head of the vise. Several customers have informed me of the following problem: While turning, the cylinder moves toward the ratchet, gives off a nasty sound and rapidly slows down the spinning head. Or, even worse in my opinion, the head is locked, you are working on your fly, when all of a sudden the ratchet comes loose, and the weight of your bobbin unwinds your pattern.
.
.
Both situations are altogether unwelcome. Experiments with wax applied on the axle solved the problem temporarily. They only lasted about a week, and the wax makes shifting the brass cylinder by hand more difficult. A good solution has to be different.
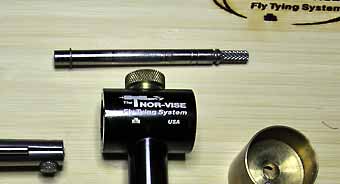 For tuning disassemble the vise.
Here´s a solution making your fly tying with the Nor-vise even easier
.
Before listing the steps necessary to make the conversion, let me tell you the prerequisites. You should have experience with mechanics. You will need a lathe and know well how to operate it, and all drilling needs to be very precise!
.
This leaves you with two options: either you have the necessary tools and know how or you have a friend who does, or you can let us handle your conversion
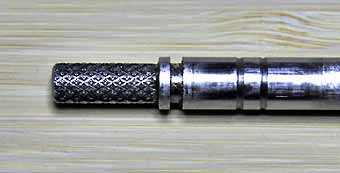 The deep groove on the left is for the rubber o-ring, the flat grooves on the right accept the spring-mounted tip of your thrust piece.
.
Norvise Tuning #2
.
Here´s the steps you have to take. Remove front and rear brass cylinders and the axle. Put the axle into your lathe and make two cylindric grooves in the right place and with the right distance. NB: this distance is just a few mm! The grooves shouldn´t be too deep either!
Next, drill a hole into the brass part and then cut a #4 (metric!) thread. Into this thread you screw (just a little ways) a thrust piece with a spring-mounted tip. Mount your axle into the vise again, and mount the two brass cylinders on the axle again. Now adjust your thrust piece in a way permitting you to move your rear brass cylinder back and forth without using a lot of force. If you have done everything right, the cylinder clicks into position in both front and back position.
.
.
With this conversion you´ll have even more fun tying your own flies with your Norvise.
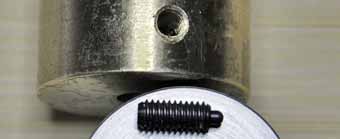 The rear brass cylinder with thread and the thrust piece with its spring-mounted tip
Take note that I advise that profound knowledge in using a lathe and in precision drilling are absolutely indispensable for this conversion. I will assume no liability whatsoever for this conversion unless it has been executed in our workshop.
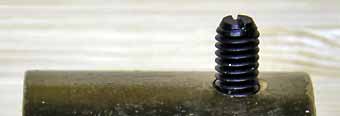 The thrust piece partially screwed in, adjust it after mounting.
.
.
Conversion including all materials, excluding shipping:
Price € 45.- . The price is in Euro, please check the exchange rate to your currency.
Wolfgang Fabisch, Nürnberger Str. 45, 90542 Eckental/Germany
✆ Germany 011 49 9126 288640, Fax 011 49 9126 288643, Wolfgang Fabisch